Showing posts with label fashion. Show all posts

Sunday, 27 February 2011

Weekend round up: Cath, caravans, contact lenses and colleagues (and other things that don't begin with 'c')

Look! Look what my lovely LOVELY colleagues got me as a leaving present!


It's only the Cath Kidston sewing box I have been coveting for aaages! I cannot wait to get all my sewing bits and bobs into it. They also gave me a voucher to spend in VV Rouleaux - I adore this shop, it has every trim, button, embellishment you could wish for. What an amazing lot, I loved working there. I will especially miss these three:

Dewey Decibelles: the final line up
I start my new job tomorrow and I have to say I'm rather nervous, but excited too. You never know some of them might be crafty ladies too, I do hope so. 

In other news, my parents came to stay for the weekend. Sadly the soggy weather put paid to our walking plans but we managed to pack in a few excellent meals (Bistro Aix in Crouch End got a BIG thumbs up) and caught the Queen exhibition at the Truman Brewery on Brick Lane. It was very interesting, with lots of Freddie's costumes, fashion drawings and even the pattern pieces of one of his white jumpsuits on display. If you're in the area check it out, it's free. I also tried contact lenses for the first time and am a complete convert - why did I never try them before?!

So with all this stuff going on, the old crafting/sewing has fallen a little by the wayside. I have picked up this red polka dot fabric though:


Isn't it cool? I have been searching for a red polka dot fabric for ages, but all the ones I've found have been a bit cheap and see-through. This one was a bit more expensive but won't need a lining to prevent flashing my underwear! I don't have any specific plans for it though - any ideas?

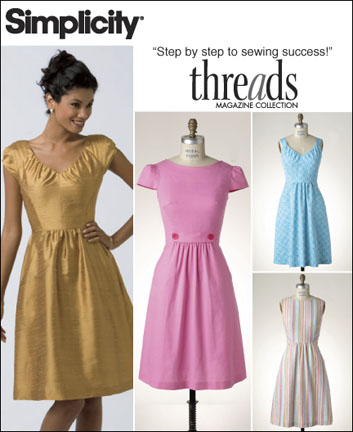
I also picked up this pattern:


I have been looking for a plain dress such as this for ages - I'm going to make a floral version of the bottom left image, but I really chose the pattern as it looked easy to adapt. Yep, I'm going to try my hand at adapting patterns. Eep! These may be famous last words but let's hope not! 

Oh. And I also had a sewing disaster. One of those pieces that just seem jinxed from the start. A mixture of a bad fabric/pattern combination and general stupidity on my part. I'll maybe post about it here soon and see if anyone has any innovative ideas as to how I can save it!

What have you been up to? Hope you all had/are having fabulous weekends. I left my parents off at Stansted this morning, and now I plan to spend the rest of the day watching 30 Rock, eating crisps and trouncing my boyfriend at Streetfighter II (my parents brought me my old Sega Megadrive!!!) and generally resting up before my first day tomorrow - perfect!

Cx

Tuesday, 15 February 2011

BHLDN: love at first sight. And gin.

BHLDN. Otherwise known as the website that made me throw a strop and demand Matt propose right this instant.* If you are planning a wedding, believe me, you need to check out this site. But this post is not about weddings, as I am not engaged. Luckily for us single ladies (oh oh oh, oh oh oh) the site also does a pretty spectacular range of fancy dresses. So this post is about gin. Gin fizz to be exact...

May I introduce to you, the "gin fizz shift"


and look at the back!


I'm very much taken with this dress, particularly the colour and shape (I'm not too fussed on the florals - a bit fussy for me, and I'd add a few inches to the length as my legs are not quite so gazelle like as the model's). It looks a bit 60s and I love the cut out detail on the back. Plus it's called a gin fizz shift, and I love gin!** Fate I tell you. It's going right into my 'inspiration' folder for when I am a more accomplished seamstress. 

Has anyone else been swooning over this delicious site? It only launched yesterday and it's already one of my firm favourites. 

* (tantrum only in head, am not a marriage crazed mental)

** my favourite gin is Hendricks. In case you were wondering. Or would like to buy me one.


Sunday, 30 January 2011

Colette Rooibos - done!

This weekend I finally finished my first proper garment of the year - the Colette Rooibos! Check me out, looking all smug!

smug!


looking suspicious!

These photos are taken with my iPhone (so I hope you can see ok - my proper camera is...somewhere) on the rooftop outside my flat. I can tell you I felt UBER glam clambering out the window in my sparkly shoes. It's the first time I've been out there since about September so it's looking particularly unkempt and all my plants have....um....ceased to be. Oops. 

Now. The Rooibos. I loved this pattern. It was a total dream to sew. And I love the finished result. So. What did I learn?

Sizing
After all my musings on muslins, I didn't make one because I am lazy. Having measured myself and finding myself between sizes, I erred on the side of caution (as advised in the pattern) and cut a size up. Tilly's just put up a really interesting post about how to cut the right size pattern, I'll definitely be referring to her tips when cutting out my next project. I fitted the bodice as I went along, adjusting any darts as necessary to ensure a good fit around the bust. With the rest of the pieces I just sewed them up normally, figuring I could take them in if necessary at the end. Which I had to do. I think if I made it again I will cut a size smaller. To resize the side hems, I put it on inside out, pinned it in and drew the stitching line on with white pen. During this process I got thoroughly stuck in the dress - unfortunately this was while Matt was in the shower so I had to wait (rigidly in a dress full of pins) until he got out to free me! At this point I also shortened the zipper so that it zips from the waistline up (it was originally a 16" zipper) as I thought it sat better that way. 

Pattern cutting
For the first time ever, I traced around my pattern pieces with chalk before cutting. I cannot believe the difference it made, the cutting and sewing up was just so much easier. It's definitely worth the extra time it takes. Also it's the first time I've used proper dressmaking scissors - can you believe it? What was I thinking before, trying to cut out fabric with paper scissors! Numpty. 

Zipping
As I just mentioned, I shortened the zipper in the end, and I think it looks better on me. However I finally had the guts to try the zipper foot on my machine and it was a revelation. A revelation. Gone are the days when I chicken out of using it and sit like a mug hand sewing in my zips! Unfortunately I was so preoccupied with my success at attaching the zipper foot that I sewed the zip on inside out the first time. However this was quickly rectified thanks to my trusty seam ripper! I'm still not terribly good at the old zips, but I'm getting better. 

Clipping
Well. You see the little collar? This is where I learnt the lesson that clipping your curves is essential. I stitched carefully around the neckline (quite tricky - lots of pointy bits) thinking I am awesome, this looks perfect. Impatiently turned it inside out to see what it looked like (I didn't want to clip until I'd checked the outside) - and my heart sank. It was puckered and looked awful. I presumed the problem was with my stitching and sat at it for ages, hand sewing, picking out stitches, swearing...until finally it clicked - the problem hadn't been with my stitching at all, it was just that I hadn't clipped around the curves/corners. I unpicked and resewed it exactly the same way as I had the first time, clipped, et voila. Perfect. Now, I would have clipped the seams eventually, I do know that much, but I just hadn't realised how much difference it would make and thought I'd made a massive error. Lesson learnt? Have more self confidence and less impatience!

Piping
I did intend to pipe the pockets and neckline (this is optional in the pattern) but I chickened out at the last minute. I will attempt the piping another time!

Material
It took me ages to find the right material for this project - I knew I wanted a heavy-ish material, but I didn't know enough about different sorts of fabrics to confidently buy online, and John Lewis just didn't have what I wanted. Eventually I found this navy polka dot material in Rolls and Rems on Seven Sisters Road (recommended - cheap as chips, some of the fabrics are a bit cheap and see through, but there are some gems). It's quite heavy with a little bit of a stretch in it. The lining material is a silver fabric I had in my stash. I wanted white originally but again John Lewis didn't have a plain white cotton so I had to improvise. I had the brainwave of using one of Matt's old shirts for the lining fabric - however I wrote an email to remind me to hunt the shirts out when I got home, and instead of sending it to myself, sent it to Matt by mistake, who promptly vetoed the idea. I think it worked out for the best though, the silver looks much better!

Finishing
I have a confession. You see these pretty buttons?


Well, they're actually a pair of earrings. I didn't originally intend to put buttons on the front, but when the dress was all sewn up the front looked like it needed an extra something. I experimented with all my brooches, my button stash, and nothing looked right. Then I caught sight of my ears in the mirror and it clicked - the earrings! Perfect! I love them as buttons on this dress, so I'll either have to find buttons like them or else figure out a way of converting the earrings so I don't get jabbed in the chest by the posts! If anyone's seen buttons like these I'd appreciate a heads up. 

I learned loads while making this pattern - I would say that although the pattern is reasonably straightforward, it's not one for beginners - for example it just says 'insert invisible zipper' with no pictures or further instruction. I guessed my way through it and it seems to have worked, but a bit more guidance might have been useful for a novice such as myself. I was also thoroughly confuddled by one of the instructions which requires you to roll up the shoulders and "flip" the garment. It ends up looking like this: 


This is the whole bodice all rolled up! I was not at all sure I was doing it correctly, but I thought I wouldn't know until I'd tried so I crossed my fingers and sewed the seam....and thank goodness I'd got it right! Again this may be an obvious method if you're a more experienced seamstress, but for me it took a leap of faith.

All in all, I think this is a fabulous pattern - I will almost definitely make it again, perhaps in a more summery colour. I'm tempted to go pattern crazy on it using two different florals, but perhaps this is going a bit far. Matt told me yesterday that my leopard print coat and sequinned hat/glove combo makes me look like I'm off out collecting cat skulls - perhaps that's a sign I should step away from the patterns?? Or maybe it would look cute with a peter pan style collar?? Possibilities possibilities!

I can't wait to try another Colette pattern, perhaps the Macaron?

I hope you've all had lovely weekends, Matt and I took a walk to Stoke Newington yesterday and had a plunder around the vintage shops then came home and ate dee-lish fresh tuna and beans while watching Harry Potter. Perfect!

Cxx

Tuesday, 18 January 2011

Matou en Peluche

I've recently come across the delightful illustrations of Matou en Peluche (thanks Tilly) and couldn't resist sharing them with you. 

so stylish - makes me want to chop my hair into a 20s bob


foxy, love the hair and the hat


I love this bird motif - it would look lovely worked up into a pattern. 

And this fan shaped dress is probably one of my favourite illustrations

cute as a button!

all images courtesy of Matou en Peluche shop and blog


Aren't they gorgeous? It's my birthday this month so I shall be dropping some heavy hints to my nearest and dearest. In the meantime I've got my sketchbook and an old copy of Vogue...let's see if inspiration strikes!

Sunday, 12 December 2010

Simplicity 2591: a dressmaking learning curve

Hello, I hope you are having a lovely Sunday. I'm hoping to crack open some mulled wine and have a mince pie in a bit. Have to wait until after my pilates class though, I rather think a tummy full of wine and pie would be frowned upon by the tiny Japanese lady that takes the class (not to mention making me feel even more like a heifer than I usually do in her company). I have finally finished this dress which I started in the summer, inspired by Karen at Did You Make That. Six months later, here it is!


Excuse the photo, Matt is in bed with suspected flu, so I've had to learn how to use the timer on my camera and this was the best of a bad bunch. So, here are the points I will take away from this experience:

Pattern
Well, the first thing I learned from making this dress is DON'T leave it lying untouched for 5 months, after which time you realise you've lost the second page of pattern instructions. This wasn't going to deter me though! Thankfully I'd made the pockets already as there was no way I would have been able to figure those out on my own. However I had to make up the rest of the pattern myself. The only thing I think really suffered from this was the armholes - I sewed in the interfacing, however I forgot to fold in the raw edges before topstitching, so they look pretty awful on the inside. There may also be some shaping details I missed out such as cuts around the curved seam. Oh well - no one will ever see the inside apart from me.

Zippers
As in, I should learn how to sew them properly. I chickened out of attempting to use the zipper foot on this occasion because of the expensive fabric and lack of instructions. Instead I machine sewed the zip into place then topstitched it by hand. It looks fine but I need to gain more confidence in this area.

Material
If you are a sewing novice, it's probably advisable not to shell out on an expensive Liberty print fabric for one of your first projects, no matter how pretty it is. That is all.

Sizing
Karen had said that the pattern was on the roomy side and that she'd gone down two sizes with it. I erred on the side of caution and cut it just one size smaller. Nevertheless the finished product was roomy. I fitted the bodice as I went along, so it fits reasonably well. It's perhaps a little blocky around the armholes (although this might have more to do with my putting together than the pattern - see above). The pattern includes a little gathering at the back waistband, however once the dress was sewn up I felt there was far too much material in the region of the derrière, making for an extremely unflattering fit. I ended up unpicking the back seam, zip and part of the waistline and removing most of the gathering, bringing the back skirt seam in by about 2 inches at the waist and probably nearer 4 towards the hem. Thank goodness for seam rippers!

And the good...
I realise I've dominated this post with all the bad things about this project - but there are good things too. I love, love LOVE the fabric (a little 'busy' for some tastes but it's very me). Here's a close up as you can't see it that well in the above photo:


I am also a big fan of the pockets, I actually hadn't realised the pattern involved pockets - the picture doesn't show them at all, but I love them.


In the end, the dress is wearable, just. Result! I'm a bit scared about wearing it out though - does anyone else have visions of their self-stitched clothes splitting at an inopportune moment? Or people looking at the ever so slightly wonky seams and thinking you're a weirdo for making your own rubbish clothes?

I learnt a lot making up this pattern and am looking forward to using my newfound skills on the Colette Rooibos pattern which is next on my stitching list. I promise I won't lose half the pattern and bodge it together myself this time!